

Photo credit: Pinterest
Hello everyone! I hope everyone is doing fine right now. My Instagram followers know that I have been making Instagram filters, I am so amazed that I finally made it! Well, I am not going rant much about how I observe ways to make it, I'm gonna go straight to the point on How to Create Your Own Instagram/Facebook Filters!
First of all, you must know the basic concept. Well, all the filters are an Augmented Reality (AR) technology where computer-generated images appear on real life through technology devices. Well, I have to face this AR subject in semester 5 later on, so why don't I expose myself to this first, right? Okay, let's begin.
Things You Need:
1. Laptop
2. Smartphone
3. A Facebook account (compulsory)
4. Spark AR Studio (Download here)
This tutorial will take you less than 10 minutes if you mastering at this. I took less than 5 minutes and I'm pretending to be surprised by it. Oh, before I forgot, don't forget to try out my Instagram filters on my profile HERE. It's fine if you don't follow me, no big deal hahahaha. These are my Instagram filters so far, have an eye to them.


So, on the first tutorial, I will teach you on how to make Instagram filter with crown effect. This is the simplest tutorial I can think of for all design beginners. So, let's try it out!
So, on the first tutorial, I will teach you on how to make Instagram filter with crown effect. This is the simplest tutorial I can think of for all design beginners. So, let's try it out!
CROW EFFECT ON INSTAGRAM FOR BEGINNER USING SPARK AR STUDIO
1. Open Spark AR Studio on your PC/Laptop that you have downloaded.
2. Go to Create New & click Blank Project

2. Go to Create New & click Blank Project

3. On your left, scene option, click Focal Distance. Right click on it, choose add then choose Face Tracker.
4. Next, on your left also, click on FaceTracker0, right click on it, choose add then click on Face Mesh.

5. Make sure the blue hover still on faceMesh0. Go to your right, click the Material plus (+) sign. Then, material0 will appear on your left, under Asset section.

6. Click on material0 and go to your right. On Shader type, change it to Retouching. The skin will be automatically smooth & you can adjust your preferences smooth, how much you want it to be. My suggestion would be 50-80. 90 above will only make it looks a bit blurry.

7. Next, click on the faceMesh0 under scene section on your left. Right click on it, click add, choose Plane.
8. You can adjust the position of the plane using the Position section on your right, and also the size of the plane using the scale part. You may ignore it beforehand and adjust after you put your Crown design. (I would suggest you to just adjust the position and the scale can be adjusted later).
9. Then, click on the Materials plus (+) sign on your right.

10. Material1 will appear under material0 on your left. Click on material1. Go to your right. Under texture, click Choose File. Then choose your crown picture that you have designed/choose from any third-party application.
11. Boom! You're done. As I said, you can adjust the plane size depends on your size of your crown.
12. Go to File > Export. Make sure everything is ticked green then you can finally export your work to your computer.
**Spark AR Studio only available on Mac & Windows on PC. The application of Spark AR Player on iOS and Android only valid for you to try out your project on Spark AR Studio (PC) if you connect your USB from your computer to your phone.
Next, I will teach you on how to send your work to be published by Facebook team. But first, you should know what you should do & have before publishing your work. You need:
These are the things that cannot be changed right after you published it. And, don't forget to set your Instagram profile to a business/creator account.
4. Next, on your left also, click on FaceTracker0, right click on it, choose add then click on Face Mesh.

5. Make sure the blue hover still on faceMesh0. Go to your right, click the Material plus (+) sign. Then, material0 will appear on your left, under Asset section.

6. Click on material0 and go to your right. On Shader type, change it to Retouching. The skin will be automatically smooth & you can adjust your preferences smooth, how much you want it to be. My suggestion would be 50-80. 90 above will only make it looks a bit blurry.

7. Next, click on the faceMesh0 under scene section on your left. Right click on it, click add, choose Plane.
8. You can adjust the position of the plane using the Position section on your right, and also the size of the plane using the scale part. You may ignore it beforehand and adjust after you put your Crown design. (I would suggest you to just adjust the position and the scale can be adjusted later).
9. Then, click on the Materials plus (+) sign on your right.

10. Material1 will appear under material0 on your left. Click on material1. Go to your right. Under texture, click Choose File. Then choose your crown picture that you have designed/choose from any third-party application.
11. Boom! You're done. As I said, you can adjust the plane size depends on your size of your crown.
12. Go to File > Export. Make sure everything is ticked green then you can finally export your work to your computer.
**Spark AR Studio only available on Mac & Windows on PC. The application of Spark AR Player on iOS and Android only valid for you to try out your project on Spark AR Studio (PC) if you connect your USB from your computer to your phone.
Next, I will teach you on how to send your work to be published by Facebook team. But first, you should know what you should do & have before publishing your work. You need:
1. Design an icon for your effect.
2. The effect cannot be used on both Instagram and Facebook.
3. Make a demo video of your filter (it will appear on your profile).
These are the things that cannot be changed right after you published it. And, don't forget to set your Instagram profile to a business/creator account.
PUBLISH YOUR WORK
1. Go to Spark AR Hub.
2. On your upper right, there's an UPLOAD button. Click the button.

3, Fill all the requirements, from your project in aproj format. Upload your project, choose the effect owner (either your Facebook page or your personal Facebook account). Choose one effect destination (Facebook or Instagram), it can't be on both social media. Upload the icon for a preview on story. Do not forget to read the t&c by Facebook at the end of the page. Tick the box.

4. Next, you will have the link to test your filter. Copy and paste the link and share it to anyone you like to try out. It is best for you to have the iOS user, old android and the latest android users as well. It will be easier for you to detect which would have problem with the filter. Valid to 50 tries/people.

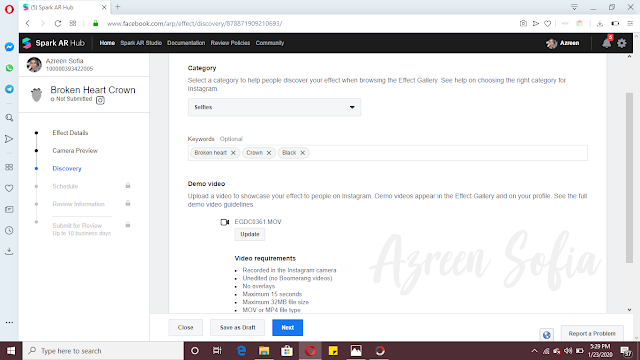
5. Next, select the categories, type keywords for people to access your filter. Do not forget to put the demo video of your filter. (Since you have the link, you may use it on your Instagram account & save it for the use of demo video). The t&c for demo video is written on the page.

6. Here, you may schedule your work to be published on certain date or you may choose for it to be published once it gets approval from Facebook team.

7. Write a summary about your filter for the team's review. It will be easier for them to approve your filter. Here's an example of my summary. I made it short, simple and gives a very direct message. You may use your own idea but well, you may use mine hahahaha.

8. Before you proceed to submit your work, you have to double check everything as it cannot be changed later. From the effect's name, icon, demo video & even a platform you wish it to be published. Then, proceed with the submission & wait for your work to get approval!

FAQs
How long will it take for Facebook to approve the project?
It takes 10 days for your filter to get approval, but usually it is faster than it. Mine takes 2-3 days ONLY.
Is there any possibility for my work to get rejected?
Yes, but usually they will approve any project you send (doesn't matter how bad it is lol) unless you did not follow the guideline given by them (cuz I faced this with one of my filters, I mis-looked at one of the guidelines hehehehe).
How many filters can I submit in a time?
You may submit as much filter as you want to. No limitation to it.
Can I submit the same filter both on Facebook & Instagram using the same design?
You better not. They'll review and reject your work anyway. Waste of time.
I don't have a design/gaming PC. Will it slower my PC performance during editing?
Well, yes. Spark AR Studio will slower down your PC performance. I suggest you guys to not use any other application/software/browser as it will piss you off. In conclusion, buy a better PC lol (I'd like to throw mine too) but it is also depending on your RAM too.
Will you post/blog any other tutorials?
Depends on the demand.
woww ingatkan tak boleh buat sendiri. nak kena try ni hihi
ReplyDeleteTry it out! Boleh guna filter sendiri je lepas ni hahahaha
Deleteyour filters are pretty! im to lazy to learn how to make my own filter ahahh i just want to use yours!
ReplyDeletehttp://mylittlestoryi.blogspot.com/2020/01/how-was-my-2019.html
Hahahahah I'd be you if I malas in certain things xD Anyway thank you!
Deletewow!!! sangat menarik untuk dicuba ni. thank you for sharing reen!
ReplyDeleteYou're most welcome!
Deletewhy i had problem on sign in my facebook accoount
ReplyDeleteUm, sis- I don't have any answer for that....
DeleteByk jgk step nk create filter tu. Xpe la. Akk guna filter yg azreen da siap wat tu je la. Hee
ReplyDeleteGood info btw.
Hahahahha tu lah, tapi serious simple gila tutorial dia. Anyway Thank you
DeleteTak pernah tahu pulak boleh buat sendiri filter ig. Pandai guna je 😅
ReplyDeleteHahahaha lepasni boleh lah try buat sekali
Deletei read this with so much focus but then i realize that i didn't even used the available filter on IG, hell i didn't even update ig story often (read: once a year)
ReplyDeletehttps://itsthesuraya.blogspot.com/2020/02/notice-changing-blogger-e-mail.html
Hahahahaha sokay, sooner or later you'll update & enjoy the new features!
DeleteOmg! I want to try it right now!
ReplyDeleteHi kak Azreen Sofia! I made my own face filter! thanks to you! i actually made a post about it in my blog and i did shout out to you too <3 hehe luvvv
ReplyDeletehttp://mylittlestoryi.blogspot.com/2020/04/i-made-my-own-instagram-face-filter.html
Hi, read it. Anyway you're welcome dear. Thank you for the tag as well!
DeleteCool. I wanna try it too. I only know how to make snapchat filters.
ReplyDeleteThat's super cool! I'm not really active on snapchat so I make instagram's instead
Delete